Sourdough Bread
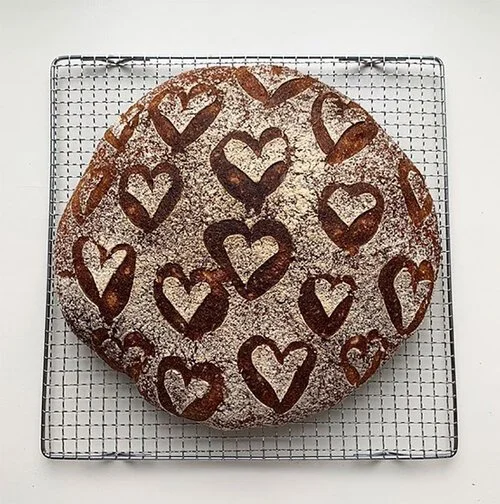
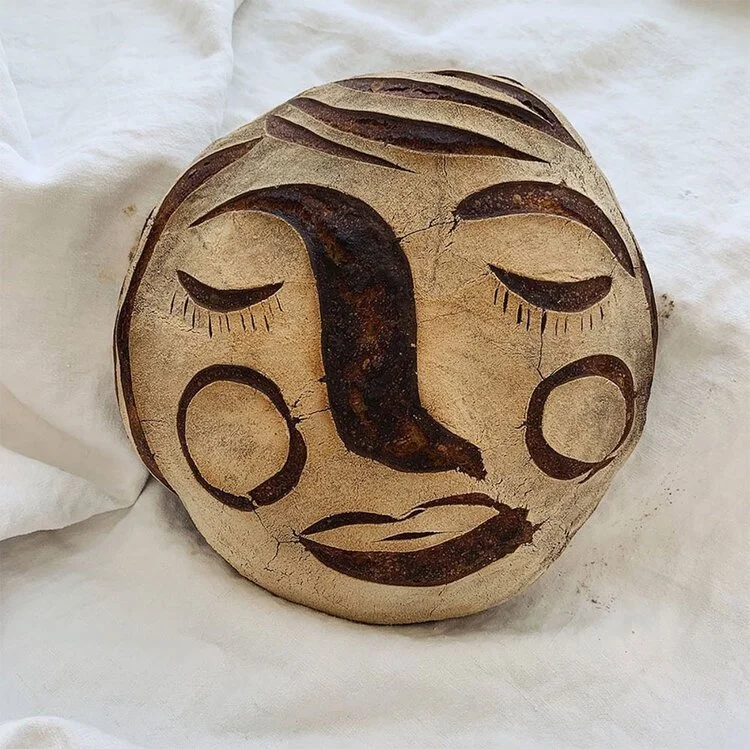
Last year, I photographed a serie of the most beautiful Breads by Linda Sofia Ring for SZ Magazin. These Breads are scored before baking and they shouldn’t have an open crust so the patterns won’t break during baking.
I admit that Sourdough Bread baking can be a little tricky in the beginning. Don’t give up, it is all about some practice. And it might all be worth it in the end. It was for me: after some flat flounders I made in the beginning, sourdough bread baking is now the most calming and satisfying activity I know. The fact that we are using only flour and water to get an aromatic loaf of bread feels almost like a wonder to me.


Light Sourdough Bread
for 1 big Loaf of Bread, perfect for scoring patterns or faces
ingredients
300g Sourdough
(made of 150g wheat flour, 150ml water and 1 Tbsp starter, see note below)
800g wheat flour 812 (bread flour), or 500g all purpose flour and 300g whole wheat flour
500 ml + 50ml water
20g salt
steps
DAY 1:
Preparing your sourdough
The evening before you make your dough: Mix 1 Tbsp starter, 150ml water and 150g flour in a little bowl. Cover with a towel and let it rise overnight.
The next morning (day2) make sure your sourdough is ready: It should have big bubbles and be very active. Take a teaspoon and drop it in bowl of water. If it swims, you are ready to go. If not, wait a little longer and make the test again.
DAY 2:
Mixing your dough (30 Minutes plus 10 Minutes kneeding)
Add your flour, 500ml water (room temperature) and 300g sourdough to a big bowl. I use my kitchen machine for kneeding but of course, you can use your hands, too. Mix until all is just combined, cover with a towel and let it rest for about 30 Minutes.
Add the remaining 50ml of water and the salt, then mix the dough for about 10 minutes. This will give your dough structure.
Lightly oil a big bowl or container and transfer your dough to it.
Fermentation and Fold (about 4 hours plus 30 minutes on the worktop)
Take the edges of the dough and fold them in the center (see Video). Cover and let rest for about 2 hours. I like to put the bowl in my turned off oven with the light on. This is slighter warmer than my kitchen and the dough can rise perfectly.
After 2 hours, have a look at your dough. Did sth happen already? I usually see some little bubbles now and the dough feels a little bit more airy. Now it is time to make a fold: Take the edges of the dough and fold them in the center (see Video).
Cover the dough and let it rest for another 2 hours. Your dough should now feel wobbly and have a lot of air inside. If it doesn't , let it rest a little longer (see my notes on fermentation)
Place your dough on your worktop and form a ball, using your dough card (see video). Let it rest uncovered for about 30 Minutes. It will flatten and you might see little bubbles on top.
Final Shape
Now it is time for the final shape. Dust your dough with a little flour, then use your dough card to turn it upside down. Fold the edges to the center to make a nice round boule. It is important not to work your dough too much now as you want the air to stay in the dough.
Place it in a floured bread basket, seam side up. Place in the fridge overnight. (about 12-24 hours, I usually bake the next morning).
DAY 3: Scoring and baking
Time to score and shape. Place a baking stone in your oven and preheat it to 220°C.
Take your bread basket out of the fridge.
Flour a pizza peel or a cutting board and place your dough upside down on it. Dust your dough with flour.
With a bread lame or a very sharp knife, cut a nice pattern, bread face or whatever you desire in your bread. Just be careful not to take too much time for it, or your dough will flatten.
Place it in the oven and bake it about 40-50 Minutes. If you have a meat thermometer, stick it into your bread at the end of the baking time: It should reach about 95-98°C.
Take your bread out of the oven, let it cool on a wire rack for at least one hour before eating it.
Some additional Notes
Ingredients
The Flour:
Use the best flour you can get. Organic. Your bread will only taste as good as your flour is.
Did you know that in Germany over 200 additives are allowed to add to flour without mentioning it on the package? I want nothing else in my flour than milled grains.
If you live near Munich, I bought my flour at Drax Mühle: wonderful taste, organic and they don’t use any additives. Also recommendable: Kunstmühle Hofbräuhaus in central Munich.
The Starter:
You only need it once. If you feed it once in a while you can keep it forever. Mine is many years old. You have several options to get one.
1. Make it yourself. This may take a while but it is surely the nicest option. You only need flour, water and some patience to make it. There are several instructions on the internet on how to make a starter ( mine is a wheat starter).
2. Ask your local organic bakery. Most bakers are nice and will give you a scoop.
3. If you live in Germany: There is a very lovely website called Sauerteigbörse where you can find a sourdough owner and sharer in your area.
4. If you live in Munich, I am happy to share some of mine with you.
Fermentation
You might notice that the temperature in your kitchen will fasten or slow your fermentation process. If your kitchen is really warm in summer, you might need less time, in winter probably more). A lot of professional recipes have temperatures for the water. I use the water as it comes out of my sink. It is a difference if you own a professional bakery and need every step to be exactly the same every day, to get a workflow as regular as possible. But in my kitchen, the temperature is always a bit different anyway so I need to learn to adjust. And my bread does not have to look exactly the same every time. You will get a feeling for your dough, the more you bake and then you will know when it is ready, no matter if you started with 15°C or 18°C.
Folds
By the way: I used to make many folds between the fermentation process, every hour or even every 30 minutes, as it is described in some bread baking books I have. Now that I have baked so many breads I feel that I don’t have to do that, in fact, I like the bread better if I don’t. It is important to mix the dough well in the beginning as I described it (I mix in my kitchen aid for 10 minutes) so that the gluten network can develop but after that for me it is just extra work.
Baking
I used to use a dutch oven for baking, which is probably the nearest you can get at home to a professional bakers oven. I baked so many breads now and got a bit sick of the heavy and hot pans that I switched to a baking/ Pizza stone instead. The result is still great. If I want a nice open crust, I place a bowl of hot water in the bottom of the oven for the first half of the baking time. It helps the crust to open. You can also spray some water in the oven with a spray bottle before closing the door.
Also, if you want the flour on top of your bread stay super white, use rice flour. I did that in the beginning, too but now I like it to get a bit of colour and usually I only have regular flour at home.
Why Sourdough instead of industrial yeast?
For several reasons. First of all: the taste. The Aroma you get with a long and slow fermented dough is incredible. You will taste the difference.
Second: Digestibility. Thanks to the long fermentation and your bacteria and natural yeasts, Sourdough Bread is a healthier alternative to fast produced, industrial bread. You will also feel the difference.